Update: I've written another post about how I edited the model.
Last week, I modified a FLAME model to make it 3D and added some other features (with help from my John). This animation is of the model running, with me wiggling it around a bit to show the 3D-ness, and then leaving it be. There are explosions!
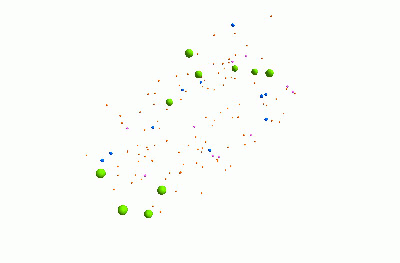
I think it's pretty cool. It represents a community of bacteria being attacked by viruses. These viruses - known as "bacteriophages" - could be really useful for treating infections, because they can kill bacteria which are resistant to traditional antibiotics.
In order to work out what dosage to use, and when to apply it, we need to know more about how bacteria and viruses interact with each other. This is difficult to study in real life, since viruses are so tiny - but by using computer models, we can make better approximations of how they behave.
The animation shows three types of bacteria, represented by green, blue and pink spheres. The orange dots are viruses. When a bacterium is infected by one of the viruses, it bursts, releasing lots of new viruses. Each virus and bacterium is an "agent" inside the model, and they each follow a particular set of rules, and carry pieces of information. I was using a piece of software called "FLAME" for this.
FLAME uses C and XML to make rules for the agents in a model. I found the documentation a bit obtuse, so I thought I'd make a blog post about exactly what I did, in case it was useful to anyone.
Initially, you need to install a set of programs - gcc, xparser, libmboard, and the FLAME visualiser. The installation instructions on the website are quite straight-forward, so I'll start my tutorial by talking about running a model.
Running a model in FLAME using the Linux command line
You can download my model code from here. It contains 4 files.
- 0.xml describes the starting state of all the agents in the model
- phageAndBacteriaV6.c contains all of the functions that the agents use
- phageAndBacteriaV6.xml describes all the agents, and the messages they send each other
- visual-rules.xml dictates how the model will be visualised
You start by using the xparser program on the xml file. I saved all my files in /home/beth/models/ so that is the location that I will use in my command line work - you should substitute it for your working folder. So: open up a terminal. Next, navigate to the directory where you have installed xparser and run
./xparser /home/beth/models/phageAndBacteriaV6.xml
This will create a load of files in home/beth/models. Navigate to /home/beth/models and run
make
This creates the model programs, most importantly one called main. You can then run the model, giving the number of iterations you want (in this case, 100) and the location of the 0.xml file (in this case, ./0.xml)
./main 100 ./0.xml
This creates a load of xml files, numbered 1 to 100. Each one contains information about every single agent in the model at a particular time step. Now, these don't look very exciting in themselves, but this is where the flame visualiser comes in.
Navigate to where you've installed the visualiser and run
./flame_visualiser
A window should pop up. Go to "File" > "Open" and find visual-rules.xml. If you click on "Open Visual Window", you should now see lots of lovely spheres. It's a fairly straight-forward program to use - you can drag the picture around, start and stop the animation, go back and forward through the iterations, and zoom. If you have a tiny screen, you can grab and move the window by holding down Alt when you click & drag.
I made my animation by opening "Image Settings" and then setting the iteration to 0 and clicking "Start Animation." This saves a series of numbered images. You can rotate the picture while you're recording if you fancy. Then I opened up The GIMP, clicked "File" > "Open As Layers" and selected all 100 images. Then I saved the image as a .gif, selecting "Save As Animation".
So that's how to run an existing model, and make a pretty picture. In my next post, I talk about how to edit one.
Edit: I forgot to add, the visual-rules.xml document was generated by the flame visualiser. You need to give each type of bacteria a radius and a colour using the visualiser, and an xml document will be generated.
